

ERASER TOOL (E):
This tutorial deals with the Eraser tool in photoshop.
As the name denotes this tool works much like a real eraser that works on a paper.
1. First open an image. To do this go to File menu and click on open option or simply press
"CTRL + O" and browse image from your hard drives and press ok. Here I took a Flower.

2. Now select Eraser tool from Tools Panel or simply press "E" in keyboard.

3. After selecting Eraser tool, you will find some options in options bar.

MODE: This option contains Brush, Pencil and Block modes. If we select Brush mode, then the Eraser tool works like a painting brush.
If we select Pencil mode, then the Eraser tool works like a writing pencil.
If we select Block mode, then the Eraser tool attains a block shape and erases the image according to block shape.
OPACITY: If we increase opacity value, then the area on which we click will be removed more transparently. If we decrease opacity value, then the area on which we click will be removed less transparently.
FLOW: If we increase Flow, then the rate of color on which we click will be erased greatly.
If we decrease Flow, then the rate of color on which we click will be erased in low quantity.
4. Click on " BRUSH PRESET PICKER " as shown in the image. Then you will find "Brush size" or "master diameter" and "Hardness". We can decrease or increase brush size by dragging slider left or right. You can also increase brush size by pressing " ] " (Right bracket) or you can decrease size by pressing " [ " (Left bracket) while working.
If we set 100% Hardness, then the brush removes the area on which we click like a stiff brush.


5. If the background layer is locked and if we click or click and dragged on the image, then the background color will be applied on the erased area.

6. If the background layer is unlocked, then the erased area will be transparent (background color will not be applied).

7. Another important and interesting option in options bar is "Erase to History". Checking this option allows us to restore the original action i.e the erased area will be restored with the original state. Here I restored the erased Flower back. Follow the image.

8. Now get back to our real erasing work that is erasing the white background to extract the flower from the background. Click or click and drag around the flower or object to erase the area. Follow the image.

9. Now hold down " CTRL + SPACERBAR " and click on the image to zoom in. This zoom in mode helps us to erase the edges of the area pixels wise. Hold down "SPACEBAR" and when cursor turns to a "HAND" symbol click on the image to move the object around the work space.
10. Now adjust brush size according to curve nature of the flower and click or click and drag around the flower edges to erase the area pixels wise by adjusting the image.

11. Hold down " ALT + SPACEBAR " and click on the image to zoom out the image. Now look at the final image, we have successfully erased the background with Eraser tool.
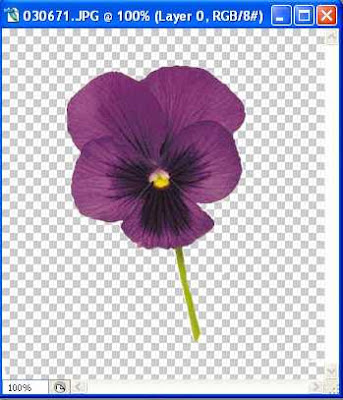
12. This flower is now ready to move into a new document or image.
Select Move tool from Tools Panel or simply press "V" in keyboard. Then click mouse left button on the Flower and drag the image or flower into a new image or document.
This image may not fit into the new document properly. so, press "CTRL + T". Then a boundary box will appear. Now put cursor at any handle (small square box) and click and hold mouse left button and drag inward to decrease the flower size or drag outward to increase the size and put the Flower in an appropriate place like in the following image.

PLEASE LEAVE YOUR COMMENT
This tutorial deals with the Eraser tool in photoshop.
As the name denotes this tool works much like a real eraser that works on a paper.
1. First open an image. To do this go to File menu and click on open option or simply press
"CTRL + O" and browse image from your hard drives and press ok. Here I took a Flower.

2. Now select Eraser tool from Tools Panel or simply press "E" in keyboard.

3. After selecting Eraser tool, you will find some options in options bar.

MODE: This option contains Brush, Pencil and Block modes. If we select Brush mode, then the Eraser tool works like a painting brush.
If we select Pencil mode, then the Eraser tool works like a writing pencil.
If we select Block mode, then the Eraser tool attains a block shape and erases the image according to block shape.
OPACITY: If we increase opacity value, then the area on which we click will be removed more transparently. If we decrease opacity value, then the area on which we click will be removed less transparently.
FLOW: If we increase Flow, then the rate of color on which we click will be erased greatly.
If we decrease Flow, then the rate of color on which we click will be erased in low quantity.
4. Click on " BRUSH PRESET PICKER " as shown in the image. Then you will find "Brush size" or "master diameter" and "Hardness". We can decrease or increase brush size by dragging slider left or right. You can also increase brush size by pressing " ] " (Right bracket) or you can decrease size by pressing " [ " (Left bracket) while working.
If we set 100% Hardness, then the brush removes the area on which we click like a stiff brush.

If we decrease Hardness, then the brush removes the area on which we click like a loose or soft brush.

5. If the background layer is locked and if we click or click and dragged on the image, then the background color will be applied on the erased area.

6. If the background layer is unlocked, then the erased area will be transparent (background color will not be applied).

7. Another important and interesting option in options bar is "Erase to History". Checking this option allows us to restore the original action i.e the erased area will be restored with the original state. Here I restored the erased Flower back. Follow the image.

8. Now get back to our real erasing work that is erasing the white background to extract the flower from the background. Click or click and drag around the flower or object to erase the area. Follow the image.

9. Now hold down " CTRL + SPACERBAR " and click on the image to zoom in. This zoom in mode helps us to erase the edges of the area pixels wise. Hold down "SPACEBAR" and when cursor turns to a "HAND" symbol click on the image to move the object around the work space.
10. Now adjust brush size according to curve nature of the flower and click or click and drag around the flower edges to erase the area pixels wise by adjusting the image.

11. Hold down " ALT + SPACEBAR " and click on the image to zoom out the image. Now look at the final image, we have successfully erased the background with Eraser tool.

12. This flower is now ready to move into a new document or image.
Select Move tool from Tools Panel or simply press "V" in keyboard. Then click mouse left button on the Flower and drag the image or flower into a new image or document.
This image may not fit into the new document properly. so, press "CTRL + T". Then a boundary box will appear. Now put cursor at any handle (small square box) and click and hold mouse left button and drag inward to decrease the flower size or drag outward to increase the size and put the Flower in an appropriate place like in the following image.

PLEASE LEAVE YOUR COMMENT
good one z
ReplyDelete