

HORIZONTAL AND VERTICAL TYPE MASK TOOLS ( SHIFT + T ):
In this tutorial we will learn about remaining Text Tools Horizontal and vertical type mask tools.
Both these tools are used to mask the background or any image with text as a selection and to fill that text selection with the background. In other words they create a quick mask using the text as a selection.
Both tools work in similar manner but Horizontal type mask tool creates horizontal text selection and vertical type mask tool creates vertical text selection.
Working with Horizontal Type Mask Tool:
1. First open an image. To do this go to File menu and click on open option or simply press "CTRL + O" and browse image form your hard drives and click on ok.

2. Now select Horizontal Type Mask Tool from Tools Panel or press "SHIFT + T".

3. Now click on the image which you want to mask with text. Then a red color covers the entire image as a mask with blinking cursor. Now type text of your choice. Follow the image.

NOTE: You can change the text style and size in options bar.
4. Now press "CTRL + ENTER" or click on " RIGHT " symbol in options bar. Then a text selection outline appears as shown in the image which indicates that this text selection outline is ready to be filled with background or ready to cut or ready for copying etc.

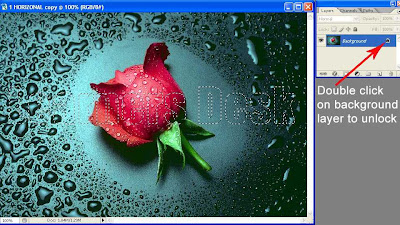
5. We have to unlock the background layer first to proceed further. To do this double click on the background layer in Layer palette. Follow the image.
6. Now go to " SELECT " menu and click on " Inverse " option.

7. You can also select Inverse option by pressing "SHIFT + CTRL + I" in keyboard to select entire image except the text selection.

8. Now press " DELETE " key in keyboard to remove entire background except the text selected area. Then press "CTRL + D" to deselect the text outline. Now look at the result.

Other way to create same effect using Layer Mask:
9. First select Vertical Type Mask Tool and repeat all above steps until step 4 i.e until Text selection outline appears. After the appearance of selection outline click on " ADD LAYER MASK " icon in Layer Palette. Follow the image.

10. This Layer mask covers the entire background except the text selection. Now look at the final outcome.

11. The main advantage of adding Layer mask is that we can move the text freely anywhere in the document with applying the background effect to the text where it is moved. To do this click on " Chain Link " in Layer Palette to unlink background layer and Layer mask. follow the image.

12. Then select " MOVE " tool from Tools Panel or simply press " V " in keyboard. Now click and hold mouse left button on the text and move or drag freely anywhere in the work space to apply that point of back ground effect to the moving text. Here I moved my text upward.

Working with Vertical Type Mask Tool:
13. Same effect can be achieved by using Vertical Type Mask Tool but the text appears in a vertical manner. Follow the image.

CONCLUSION: Both these tools are very useful when a person wants to apply his favorite background color or effect to the text.
PLEASE LEAVE YOUR COMMENTS
In this tutorial we will learn about remaining Text Tools Horizontal and vertical type mask tools.
Both these tools are used to mask the background or any image with text as a selection and to fill that text selection with the background. In other words they create a quick mask using the text as a selection.
Both tools work in similar manner but Horizontal type mask tool creates horizontal text selection and vertical type mask tool creates vertical text selection.
Working with Horizontal Type Mask Tool:
1. First open an image. To do this go to File menu and click on open option or simply press "CTRL + O" and browse image form your hard drives and click on ok.

2. Now select Horizontal Type Mask Tool from Tools Panel or press "SHIFT + T".

3. Now click on the image which you want to mask with text. Then a red color covers the entire image as a mask with blinking cursor. Now type text of your choice. Follow the image.

NOTE: You can change the text style and size in options bar.
4. Now press "CTRL + ENTER" or click on " RIGHT " symbol in options bar. Then a text selection outline appears as shown in the image which indicates that this text selection outline is ready to be filled with background or ready to cut or ready for copying etc.

5. We have to unlock the background layer first to proceed further. To do this double click on the background layer in Layer palette. Follow the image.

6. Now go to " SELECT " menu and click on " Inverse " option.

7. You can also select Inverse option by pressing "SHIFT + CTRL + I" in keyboard to select entire image except the text selection.

8. Now press " DELETE " key in keyboard to remove entire background except the text selected area. Then press "CTRL + D" to deselect the text outline. Now look at the result.

Other way to create same effect using Layer Mask:
9. First select Vertical Type Mask Tool and repeat all above steps until step 4 i.e until Text selection outline appears. After the appearance of selection outline click on " ADD LAYER MASK " icon in Layer Palette. Follow the image.

10. This Layer mask covers the entire background except the text selection. Now look at the final outcome.

11. The main advantage of adding Layer mask is that we can move the text freely anywhere in the document with applying the background effect to the text where it is moved. To do this click on " Chain Link " in Layer Palette to unlink background layer and Layer mask. follow the image.

12. Then select " MOVE " tool from Tools Panel or simply press " V " in keyboard. Now click and hold mouse left button on the text and move or drag freely anywhere in the work space to apply that point of back ground effect to the moving text. Here I moved my text upward.

Working with Vertical Type Mask Tool:
13. Same effect can be achieved by using Vertical Type Mask Tool but the text appears in a vertical manner. Follow the image.

CONCLUSION: Both these tools are very useful when a person wants to apply his favorite background color or effect to the text.
PLEASE LEAVE YOUR COMMENTS
No comments:
Post a Comment