Please notify me if you find any illegal activity or violation of rules in this blog.
My email id: zshady9@gmail.com
HOW TO DOWNLOAD
1. First click on "DOWNLOAD" Link.
2. A New page will be loaded. In that page click on the icon which is shown in the image.
3. A drop down menu will appear. From that menu click on DOWNLOAD Option to start your download.
31-BUBBLES Download
32-BUBBLES3 Download
33-BUBBLES 2 Download
34-BUTTERFLIES Download
35-CALLIGRAPHICS Download
36-CORNER BORDERS Download
37-CURVES Download
38-CURVEs 2 Download
39-GEASS SYMBOLS Download
40-PLANETS-LEAVES-BOXES Download
PLEASE LEAVE YOUR COMMENTS
MAGIC ERASER TOOL (SHIFT + E):
This tool works like Magic Wand Tool.
Magic Eraser tool is used to erase color of an area by just one click.
This tool works by taking pixel color as sample on which we click and erases that color.
This tool is basically very useful when we need to erase hard color by just one click.
1. First open an image. To do this go to File menu and click on open option or simply press
" CTRL + O " and browse image from your hard drives and press ok.
2. Now select Magic Eraser Tool from Tools Panel or press " SHIFT + E ".
3. After selecting Magic Eraser tool, you will find some options in options bar.
TOLERANCE: Tolerance value defines the range of color that will be erased.
Low Tolerance value erases colors that are very similar to the pixel color on which we click.
Here first I used 50% Tolerance value and clicked on the first Floral Petal. Then this low
Tolerance value only erased some amount of color in that petal which is very similar to the pixel color on which I clicked.
But I wanted to erase entire Petal with just one click. so we need to use "Higher Tolerance value".
Higher Tolerance value erases colors within a broader range i.e erases pixel color on which we click along with some other relative colors. Here I clicked on Petal top color(orange). But the lower light yellow color is also erased along with top color because of Higher Tolerance value.
ANTI-ALIAS: By default this option is checked. It helps in producing smooth edges while colors are erasing.
CONTIGUOUS: If we check this option, then only the color on which we click will be erased even though there are other similar colors or objects present in the image i.e only the color on which we click will be affected.
Here I checked "CONTIGUOUS" option and clicked on first Petal, then only that Petal on which I clicked was erased
If we uncheck "CONTIGUOUS" option, then the color on which we click will be erased along with all other similar colors or objects in the image.
Here I clicked on first Petal, then that Petal was erased along with all other similar Petals.
OPACITY: Opacity defines the strength of erase.
Lower Opacity value erases the pixel color on which we click to a lower transparency state.
Here I selected 50% Opacity value. Then only a partial transparent state was created.
Higher Opacity value erases the pixel color on which we click completely.
Here I used 100% Opacity value and the color on which I clicked was turned to a complete transparent state i.e completely erased.
SAMPLE ALL LAYERS: If we check this option means Photoshop samples the erased color using combined data form all visible layers.
PLEASE LEAVE YOUR COMMENTS
BACKGROUND ERASER TOOL (SHIFT + E):
This tutorial deals with the very interesting tool Background Eraser Tool.
This tool is basically used to erase background of an image easily.
But as the name denotes this tool can not recognize what is background and what is foreground in an image.
This tool basically works and erases areas which comes under the Eraser cross hair or target symbol by taking that areas as samples.
1. Select Background Eraser Tool from Tools Panel or press "SHIFT + E".
2. Now Eraser tool looks like in the following image(round shape with a cross hair or target symbol in the middle).
NOTE: You can increase or decrease size of the Eraser tool. Press " ] " (right bracket) to increase the size or press " [ " (left bracket) to decrease the size.
The target symbol samples the color or area which comes under it and erases only that area or color. Here I want to erase only "Red color" in my image. so I clicked and dragged over the red color without touching the target symbol to the other color.
4. If target symbol moves to the other color, then Eraser tool samples that color and erases that other color. In my image I moved target symbol to the yellow color and that yellow color has sampled and erased by Eraser tool.
5. After selecting Eraser tool, you will find some options in options bar.
First we will deal with "Sampling options" in options bar.
There are 3 types of Sampling options Continuous, Once and Sampling Background Swatch.
By default "CONTINUOUS" sampling option is selected. This means Eraser tool continuously samples the color which comes under the target symbol and erases that color like we worked above.
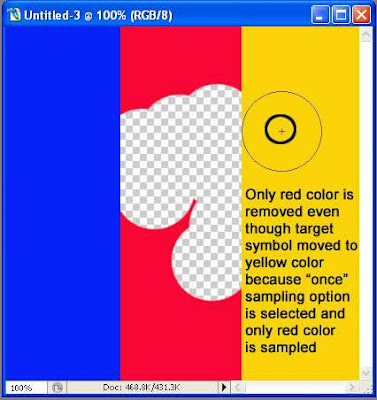
ONCE: If we select "Once" sampling option, then Eraser tool samples the color once which comes under the target symbol and erases that sampled color only even though if we move the Eraser target symbol to the other colors. Here in my image I selected "Once" sampling option and clicked on "Red color" and Eraser tool sampled red color which is present under target symbol and erased only red color, even though the target symbol moved to the "Yellow color"
(with still mouse button holding).
NOTE: Do not release mouse left button while moving target symbol to other colors while working with ONCE option. If you release mouse button and clicked on other color, then Eraser picks that other color and erases that color only.
SAMPLING BACKGROUND SWATCH: If you unable to erase very small area's color or If the target symbol doesn't fit into small areas, then use "Sampling Background Swatch" option.
First select Sampling background swatch option in options bar and click on set background tool in Tools Panel. Then a color picker window will be appeared. Now select a color which is almost similar to color which you want to erase. Now click or click and drag over the small areas to erase those areas.
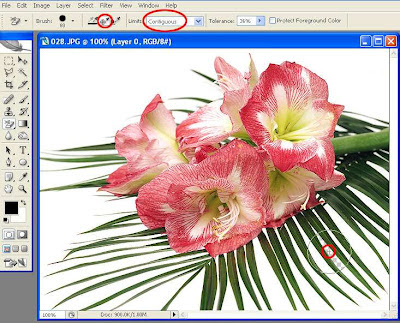
Now we will deal with "LIMITS OPTION". This option contains 3 more options: Contiguous, Discontiguous and Find edges.
CONTIGUOUS: By default this option is selected. This option selected means only the area which is present under target symbol is sampled and that area only will be erased even though the Eraser circle present on the other same color.
Here I took a Flower image and by default "Contiguous" options is selected and I clicked on a small white area between two Leaflets. Then only the "white" color which is present under the target symbol was removed and the other same color which is present under the Eraser circle remained as it is.
DISCONTIGUOUS: If we select Discontiguous option, then the color or area which is present under the target symbol will be erased along with the other same color or area which is present under the Eraser circle.
Here I clicked on the "white color" between two Leaflets. Then the white color which is present under target symbol was erased along with other "white area or color" which is present under the Eraser circle.
FIND EDGES: This option helps in protecting the object from becoming "Semi transparent". Generally if you click on the background color without selecting "Find Edges option", then you may notice that the object becoming "semi transparent". So to prevent the object from becoming semi transparent, select "Find Edges option".
Here I selected Discontiguous option and clicked above the Flower as shown in the image. Then the background was erased and the Flower has become "semi transparent".
Then I selected "Find Edges" option and clicked on the above the Flower. Then the background was erased and the Flower was protected from becoming "semi transparent".
TOLERANCE: By default Tolerance value is set to 50%. This value always gives better results.
If the background color is very similar to the Subject, then use low Tolerance value.
If background color and the subject colors are contrasting or differing more, then use higher Tolerance value.
Here in my case I selected default Tolerance value 50%. Then Eraser tool removed background along with some part of Mountains.
Actually in my image background color(sky) is very similar to Mountains color(subject). Hence I used low Tolerance value(15%) and again clicked on the background. Now only the background was erased leaving Mountains untouched.
PROTECT FOREGROUND COLOR: As the name denotes this options helps in protecting Foreground color from being erased. If you do not want to work with Tolerance value, then use "Protect Foreground Color option".
To do this open an image. Then select Eyedropper tool from Tools Panel or simply hold down "ALT " key in keyboard and when cursor turns to a dropper symbol, click on the color which you want to protect from being erased. This color will be set as a Foreground color.
Here I want to protect the Flower color and I clicked on the Flower color with Eyedropper tool.
Now this color was set as Foreground color. Then I clicked and dragged over the background. Only the background was erased and Flower was protected form being erased with Eraser tool.
PLEASE LEAVE YOUR COMMENTS
Please notify me if you find any illegal activity or violation of rules in this blog.
My email id: zshady9@gmail.com
HOW TO DOWNLOAD
1. First click on "DOWNLOAD" Link.
2. A New page will be loaded. In that page click on the icon which is shown in the image.
3. A drop down menu will appear. From that menu click on DOWNLOAD Option to start your download.
21-3D SMOKE Download:
22-ANGEL WINGS Download:
23-ANGRY 1 Download:
24-ANGRY 2 Download:
25-BACKGROUNDS Download:
26-BACKWORKS Download:
27-BASIC BRUSHES Download:
28-BORDERS 1 Download:
29-BOXES FEATHERS Download:
30-BRUE Download:
PLEASE LEAVE YOUR COMMENTS
Please notify me if you find any illegal activity or violation of rules in this blog.
My email id: zshady9@gmail.com
HOW TO DOWNLOAD
1. First click on "DOWNLOAD" Link.
2. A New page will be loaded. In that page click on the icon which is shown in the image.
3. A drop down menu will appear. From that menu click on DOWNLOAD Option to start your download.
11-KELVIN Download:
12-MUSIC Download:
13-ROBOS Download:
14-SHADOWS Download:
15-SHADOWS 2 Download:
16-SKULLS Download:
17-SWIRLS 1 Download:
18-Wet Media Brushes Download:
19-ZSHADY's Download:
20-ZSHADY's 2 Download:
PLEASE LEAVE YOUR COMMENTS