Play Online Rummy Game

Play Online Rummy Game
Win Cash Prizes

Search This Blog

Monday, September 17, 2012

About Photoshop Zoom and Hand Tools

ZOOM (Z) AND HAND (H) TOOLS :
 

In this tutorial we are going to learn about Zoom and Hand Tools together. Because we can work with Hand tool only in Zoom mode.

Sometimes we will have to observe some objects very closely to have a look at specific areas to know clearly what is there.Like, if you are working with little facial blemishes, then you will need to observe the range of blemishes. so to observe blemishes clearly you should work with zoom mode.

Hence to observe any error or anything in an image in a pixel wise view we need to work with Zoom in mode.

At the end of this tutorial you will be completed with Zoom in and Zoom out modes, working with Hand tool and some Keyboard shortcuts.

1.  First open any image. Here I took a Flower. Now I want to select the flower. To do this choose any selection tool and draw an outline around the flower. Here I have chosen pen tool for selection.


But we are not able to select flower edges properly in Normal mode.

2.  To select edges of the flower properly with pixel wise we need to work with Zoom in mode. To do this select Zoom tool from tools panel or you can use keyboard short cuts to work with Zoom tool which will be explained at the end of tutorial.


NOTE:  After selecting Zoom tool, you will find " + " and " - " symbols in options bar. " + " is for zoom in and " - " is for zoom out.

3.  After selecting Zoom tool a " + " symbol cursor appears. Then click(click multiple times to zoom the image more) on image to Zoom in. Now you can see the image in a pixels wise view clearly. Then select the edges of image properly with any selection tool.


HAND TOOL:

4.  While working with Zoom in mode, we will have to move or adjust the image for selecting the image properly. Hence to move the image around the work space we need to use Hand tool.


To do this select Hand tool form Tools Panel or hold down SPACEBAR and when cursor turns to a hand symbol click on the image and drag the image according to your need and select the image properly.

5.  Here I have selected Flower properly by working with Zoom in mode and by adjusting the image with Hand tool.


KEYBOARD SHORTCUTS:

Press letter " Z " in keyboard. Then cursor turns to " + " symbol. Now click on the image to Zoom in. Hold down " ALT " key and when cursor turns to " - " symbol, click mouse left button on the image to Zoom out.

Hold down "CTRL + SPACEBAR" and click on the image to Zoom in. Hold down " ALT + SPACEBAR " and click on the image to Zoom out.
 

Press "CTRL + +" in keyboard to Zoom in. Press "CTRL + - " in keyboard to Zoom out.

PLEASE LEAVE YOUR COMMENTS

Sunday, September 16, 2012

About Photoshop Eraser Tool

ERASER TOOL (E):

This tutorial deals with the Eraser tool in photoshop.

As the name denotes this tool works much like a real eraser that works on a paper.

1.  First open an image. To do this go to File menu and click on open option or simply press
"CTRL + O" and browse image from your hard drives and press ok. Here I took a Flower.


2.  Now select Eraser tool from Tools Panel or simply press "E" in keyboard.


3.  After selecting Eraser tool, you will find some options in options bar.


MODE: This option contains Brush, Pencil and Block modes. If we select Brush mode, then the Eraser tool works like a painting brush.

If we select Pencil mode, then the Eraser tool works like a writing pencil.

If we select Block mode, then the Eraser tool attains a block shape and erases the image according to block shape.


OPACITY: If we increase opacity value, then the area on which we click will be removed more transparently. If we decrease opacity value, then the area on which we click will be removed less transparently.

FLOW: If we increase Flow, then the rate of color on which we click will be erased greatly.
If we decrease Flow, then the rate of color on which we click will be erased in low quantity.

4.  Click on " BRUSH PRESET PICKER " as shown in the image. Then you will find "Brush size" or "master diameter" and "Hardness". We can decrease or increase brush size by dragging slider left or right. You can also increase brush size by pressing " ] " (Right bracket) or you can decrease size by pressing " [ " (Left bracket) while working.


If we set 100% Hardness, then the brush removes the area on which we click like a stiff brush.


If we decrease Hardness, then the brush removes the area on which we click like a loose or soft brush.


5.  If the background layer is locked and if we click or click and dragged on the image, then the background color will be applied on the erased area.


6.  If the background layer is unlocked, then the erased area will be transparent (background color will not be applied).


7.  Another important and interesting option in options bar is "Erase to History". Checking this option allows us to restore the original action i.e the erased area will be restored with the original state. Here I restored the erased Flower back. Follow the image.


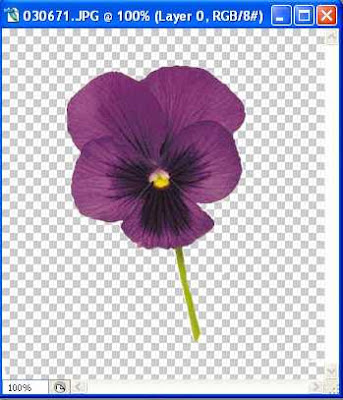
8.  Now get back to our real erasing work that is erasing the white background to extract the flower from the background. Click or click and drag around the flower or object to erase the area. Follow the image.


9.  Now hold down " CTRL + SPACERBAR " and click on the image to zoom in. This zoom in mode helps us to erase the edges of the area pixels wise. Hold down "SPACEBAR" and when cursor turns to a "HAND" symbol click on the image to move the object around the work space.

10.  Now adjust brush size according to curve nature of the flower and click or click and drag around the flower edges to erase the area pixels wise by adjusting the image.


11.  Hold down " ALT + SPACEBAR " and click on the image to zoom out the image. Now look at the final image, we have successfully erased the background with Eraser tool.


12.  This flower is now ready to move into a new document or image.

Select Move tool from Tools Panel or simply press "V" in keyboard. Then click mouse left button on the Flower and drag the image or flower into a new image or document.

This image may not fit into the new document properly. so, press "CTRL + T". Then a boundary box will appear. Now put cursor at any handle (small square box) and click and hold mouse left button and drag inward to decrease the flower size or drag outward to increase the size and put the Flower in an appropriate place like in the following image.


PLEASE LEAVE YOUR COMMENT  

Friday, September 14, 2012

About Photoshop Horizontal And vertical Type Mask Tools

HORIZONTAL AND VERTICAL TYPE MASK TOOLS ( SHIFT + T ):

In this tutorial we will learn about remaining Text Tools Horizontal and vertical type mask tools.

Both these tools are used to mask the background or any image with text as a selection and to fill that text selection with the background. In other words they create a quick mask using the text as a selection.

Both  tools work in similar manner but Horizontal type mask tool creates horizontal text selection and vertical type mask tool creates vertical text selection.

Working with Horizontal Type Mask Tool:

1.  First open an image. To do this go to File menu and click on open option or simply press "CTRL + O" and browse image form your hard drives and click on ok.


2.  Now select Horizontal Type Mask Tool from Tools Panel or press "SHIFT + T".


3.  Now click on the image which you want to mask with text. Then a red color covers the entire image as a mask with blinking cursor. Now type text of your choice. Follow the image.


NOTE:  You can change the text style and size in options bar.

4.  Now press "CTRL + ENTER" or click on " RIGHT " symbol in options bar. Then a text selection outline appears as shown in the image which indicates that this text selection outline is ready to be filled with background or ready to cut or ready for copying etc.


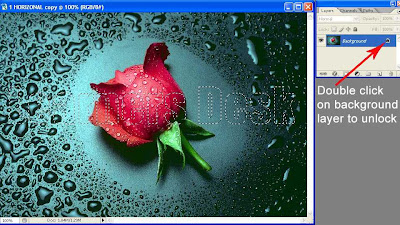
5.  We have to unlock the background layer first to proceed further. To do this double click on the background layer in Layer palette. Follow the image.


6.  Now go to " SELECT " menu and click on " Inverse " option.


7.  You can also select Inverse option by pressing "SHIFT + CTRL + I" in keyboard to select entire image except the text selection.


8.  Now press " DELETE " key in keyboard to remove entire background except the text selected area. Then press "CTRL + D" to deselect the text outline. Now look at the result.


Other way to create same effect using Layer Mask:

9.  First select Vertical Type Mask Tool and repeat all above steps until step 4 i.e until Text selection outline appears. After the appearance of selection outline click on " ADD LAYER MASK " icon in Layer Palette. Follow the image.


10.  This Layer mask covers the entire background except the text selection. Now look at the final outcome.


11.  The main advantage of adding Layer mask is that we can move the text freely anywhere in the document with applying the background effect to the text where it is moved. To do this click on " Chain Link " in Layer Palette to unlink background layer and Layer mask. follow the image.


12.  Then select " MOVE " tool from Tools Panel or simply press " V " in keyboard. Now click and hold mouse left button on the text and move or drag freely anywhere in the work space to apply that point of back ground effect to the moving text. Here I moved my text upward.


Working with Vertical Type Mask Tool:

13.  Same effect can be achieved by using Vertical Type Mask Tool but the text appears in a vertical manner. Follow the image.


CONCLUSION: Both these tools are very useful when a person wants to apply his favorite background color or effect to the text.

PLEASE LEAVE YOUR COMMENTS  

Thursday, September 13, 2012

About Eyedropper Tool


EYEDROPPER (I):

In this tutorial we will cover color sampling tool Eyedropper.

This tool is used to sample color from any area of your choice and this sampled color can be used for further use.

1.  Open an image. To do this go to file menu and click on open option or simply press CTRL + O and browse image from your hard drives and press ok. Here I took a flower.


2.  Now select Eyedropper tool from Tools Panel or simply press " I " in keyboard.


3.  Now I want to sample or pick up the color of the flower petal. To do this put cursor on flower petal and click mouse left button. Then this color appears as a Foreground color.


NOTE:  If you want to set this color as a Background color, then hold down "ALT" key and click mouse left button on the petal to set that color as a Background color.

4.  We can select color not only from the image that is opened in photoshop but also can be selected from any other application. Here I want to select color from my Desktop wallpaper. To do this click and hold mouse left button in the image that is opened in the photoshop and drag the Eyedropper from photoshop window to the Desktop wallpaper. Now look at the image, wallpaper color was set as Foreground color using Eyedropper.


5.  Now this Foreground color can be used to fill, paint and to apply strokes.


PLEASE LEAVE YOUR COMMENTS 


Wednesday, September 12, 2012

About Photoshop Foreground And Background Colors

SETTING FOREGROUND AND BACKGROUND COLORS:

In this tutorial we are going to learn how to set Foreground and Background colors.

Photoshop allows us to change Foreground and Background colors.

The Foreground color is used to fill, paint and to apply strokes.

The Background color is used to fill Gradients and to fill erased areas of an image.


Default Foreground color is Black and default Background color is white. We can toggle between these colors by pressing "X" in keyboard.

We can set default Foreground color(black) and default Background color(white) at anytime by clicking on the icon shown in the image or by pressing "D" in keyboard.

How to set or change Foreground and Background colors:

The Foreground and Background colors can be set or changed using Color Picker, using Color swatches and using Eyedropper.

Setting color Using Color Picker:


1.  First click on Foreground or background color to display Color Picker window.

2.  In that window you will find "the color field"(large square box) and a color slider.

3.  You can drag slider upward or downward to change color variation. While dragging slider, the color variation will be displayed in color field box. Move the slider until you find the variation of your choice in color field. Then click on any color of your choice and press ok. Now this color will be appeared as a new Foreground or Background color.


NOTE:  If your selected color is not suitable for printing, then a warning icon will be displayed. clicking on this icon automatically sets the nearest color to the selected color which can be printable.

If your selected color is not a web safe color, then another warning icon appears. clicking on this icon automatically selects a color which is nearest to your selected color. Use these options only if you want to print the image.

You can also select colors from Web based colors by checking only Web colors box.

4.  Now you can fill this new Foreground or Background colors by using keyboard shortcuts.

To Fill Foreground: Hold down "ALT" key in keyboard and press "BACKSPACE" to fill Foreground color.

To Fill Background: Hold down "CTRL" key in keyboard and press "BACKSPACE" to fill Background color.


Setting Color using Swatches Palette:

we can also select colors from Swatches Palette. This palette is present at the top right side in photoshop.

5.  Now in color palette click on any color of your choice. Now this color is applied to Foreground color.

If you want to set Background color, then hold down CTRL and click mouse left button on any color of your choice. This adds a new Background color.


6.  click on icon present at the top right side of swatch palette to display Swatch Panel menu. This menu helps us to manage Swatch display settings and also contains different Swatch color sets. select any color Swatch from the list and select any color from that color swatch to set ForEground or Background color.


We can also set Foreground and Background colors by using Eyedropper which can be explained in next tutorial.

PLEASE LEAVE YOUR COMMENTS 

Tuesday, September 11, 2012

About Photoshop Blur Tool

BLUR TOOL (R):

As the name denotes this tool blurs an image or portions of an image.

Blur means making parts or images unclear. Sometimes Blurring helps in covering imperfections or problem areas in am image. The Blurred area blend in or combines with the background.

Blur Tool also helps in covering or blurring small facial blemishes or removing wrinkles.

1.  Open an image with some problem areas. Go to File Menu and click on Open option or simply press CTRL + O and browse image from your hard drives and press ok.


2.  Then select Blur Tool from Tools Panel or simply press "R" in keyboard.


3.  After selecting Blur Tool you will find some options in options bar.


BRUSH PRESET PICKER: Selecting appropriate brush always plays an important role in getting good result. so, select correct brush from Brush preset picker. always select Soft brush. Here I selected Soft round brush 27.

MODE: Always select default mode Normal. But if we select Lighten mode, then the darker imperfections will be blurred. If we select Darken, then lighter areas will be blurred.

STRENGTH: It is an important option. If we select higher Strength value, then we will get a strong blur. If we set lower Strength value, then we will get lighter blur.

Always use 50% Strength value to get better result.

SAMPLE ALL LAYERS: Always check this option. If we check this option means we are allowing Photoshop to sample from all visible layers. This means Photoshop will look at the image on the background layer as well.

3.  Now add a New layer. To do this go to Layer Palette and click on New layer Icon. Follow the image.


Now we will do all work on this New layer. If work on the original image, then there
might be a chance of making our original image worst.

4.  Now check Sample All Layers option in options bar. Then press and hold CTRL + SPACEBAR and click on the image to Zoom in. Hold down SPACEBAR and click on the image to move image around the workspace.

NOTE:  Hold down ALT + SPACEBAR and click on the image to Zoom out.

5.  Now click and hold mouse left button and drag over imperfections or problem areas.

NOTE: You may need to drag multiple times on the problem areas until the area covered or blurred completely.


6.  Now I have successfully covered or blurred small facial blemishes with Blur Tool. Look
at the final result.


PLEASE LEAVE YOUR COMMENTS 

About Photoshop Smudge Tool

SMUDGE TOOL (SHIFT + R):

In this tutorial we are going to learn what is Smudge Tool and what it does.

This tool is used as a color spreader. This tool picks up color of the area on which we click and smears or spreads this color into adjacent colors. It works like moving finger in wet paint.

This tool is mainly used in digital painting. But also can be used to remove blemishes or wrinkles on face. Hence it can also be used as a retouching tool.

1.  First open an image. To do this go to File Menu and click on open option or simply press CTRL + O and browse image from your hard drives and press ok.

Here I took an image which contains different colors.


2.  Then select Smudge Tool from Tools Panel or simply press SHIFT + R in keyboard.


3.  Now you will find some options in options bar.


MODE: These blend modes help in combining or blending in with the background.

STRENGTH: Always use lower Strength value but not zero(it affects nothing).

If we set lower Strength value, then the Smudge tool picks up lower amounts of color from the area on which we click and smears or spreads that amount of color in to adjacent colors. After setting strength value click and hold mouse left button and drag over any color to spread that color. Here I have set 30% strength value. Look at the result with 30% value.


If we set higher Strength value, then Smudge tool picks up higher amounts of color from the area on which we click and smears or spreads that amount of color into adjacent colors.


FINGER PAINTING: If we want to paint with foreground color, then check this option. If we check this option means Smudge tool picks up current foreground color and smears or spreads this color into adjacent colors. It is just like dipping finger in paint and spreading the color.

If we set Strength value lower, then the current foreground color will be applied in less amounts.

If we set higher strength value, then current foreground color will be applied in higher amounts(if we set 100% then foregroun color will be applied as it is).

Here I have set 50% strength value.


NOTE:  If we uncheck this option, then only the color of the area on which we click will be affected. current foreground color will not be picked up by Smudge tool.

Using Smudge Tool as a Retouching Tool:

1.  First open an image which contains facial blemishes.


2.  Now add a new layer. To do this click on New layer icon in Layer palette. follow the image.


Now we will do all work on this new layer to protect our original image.

3.  Then select Smudge tool and check the option "sample all layers" in options bar. If we check this option means we are allowing Photoshop to sample from all visible layers.

4.  Now click and hold mouse left button at the fine area and smear or spread this area over the problem area.

Do like this until all blemishes are covered with fine area.

5.  Now look at the final image.


NOTE:  Uncheck "Finger Painting" option and set Mode to Lighten while working with facial blemishes.


Removing Wrinkles with Smudge Tool:

1.  Open an image which contains wrinkles on face.

2.  Now select Smudge tool and set all options as shown in the picture. Then click and hold mouse left button at fine area and drag this area over the problem area.

Now compare image after retouching with Smudge Tool.


PLEASE LEAVE YOUR COMMENTS