Blending options help us to combine or match layers with the background layers by using
color properties or color pixels of the layers.
1. SCREEN: This blending option ignores "Black" color and makes other colors in the image
"Lighter".
2. MULTIPLY: This blending option ignores "White" color in the image and makes other colors in that image "Darker".
3. OVERLAY: This blending option ignores "Grey" color in an image and makes other colors in that image "Lighter or Darker" and increases "Contrast".
Please Leave Your Comments.
We all know that we can add text in horizontal and vertical manners in photoshop. But a few know that text can also be entered in any shape or in any manner by using pen tool. Here I am going to add text in a curvy path.
1. Go to File menu and click on "Open" option or simply press "CTRL + O" in keyboard and browse any image from your hard drive and press ok. Here I took an image of a Rainbow.
2. We can add text in any shape by using "Pen tool". Hence select "Pen tool" from Tools Panel or simply press "P" in keyboard.
3. To make a curve with Pen tool, first put "an anchor point" at the point from where you want to start adding text. Here I have put the 1st anchor point at the starting point of rainbow.Follow the image.
4. Now we have to put "2nd anchor point" at the middle of the Rainbow. While adding 2nd anchor point don't release mouse left button. If you release, then a straight line will be added as shown in the image.
NOTE: If we want to create a curved path with pen tool, we should not release mouse left button while adding 2nd anchor point.
5. After adding "2nd anchor point" without releasing mouse left button, move mouse upwards or downwards or left side or right side according to the curve nature we required. Here I have moved in right direction.
NOTE: You can also adjust curve nature by using "ALT" and "SHIFT" keys if you are still not satisfied with your desired curve nature.
6. Now continue to put anchor points in above said ways (holding mouse left button, move mouse in up or down or right or left directions and use "ALT" and "SHIFT" keys if required for furter adjustments.)
Here I required only 3rd anchor point and photoshop automatically adds the required curve according to 1st curve part When I click at the end of the rainbow. Follow the image.
7. Then select "Text tool" from Tools Panel or simply press "T" in keyboard.
8. Now put cursor at the 1st anchor point and when cursor turns to a shape as shown in the image click mouse left button. Follow the image.
9. Now type the text of your choice. Change Font size, Font color and Font type of your choice.
10. To make our text more attractive, go to "Layer Palette" and double click on "Text layer".
11. Then a "Layer style" window will be opened. In that window click on "GRADIENT OVERLAY" option. Then click on "Gradient picker"(an inverted triangle) and select any gradient style and press ok. Here I have chosen "Spectrum gradient".
12. Now look at the beautiful curved text effect which we have created using Pen tool.
Please Leave Your Comments
Making this effect in Photoshop is a very simple trick. Placing a photo behind a broken glass
can be done with the use of a blending mode "SCREEN". To do this follow the steps.
1. First go to File menu and click on open option or simply press "CTRL + O" in keyboard. Then browse an image of your choice (image of a "Face" especially) which you want to put behind the broken glass.
2. Now open another image of a broken glass from your hard drive.
3. Now select "MOVE" tool from Tools Panel.
4. Now click and hold mouse left button on the broken glass image and drag it into the window that contains the image of a Face.
5. Now adjust the broken glass image properly over the image of face in a way that it fits the background face image.
6. Now it is time for a little magic. Go to "Layer palette" and click on an inverted triangle that shows several "Blending modes". Follow the image.
7. Then click on "SCREEN" blending option from that list. That's it, the photo of a face has successfully put behind the broken glass in a natural way by using "SCREEN" blending option.
Please Leave Your Comments
13. Now we have to add same effect in downwards. To do this put cursor on the previous effect at start point and drag downwards.
NOTE: Click and hold mouse left button then hold down "SHIFT" key and move downwards as said above.
14. Do this several times until the end point of previous effect reached. Follow the image.
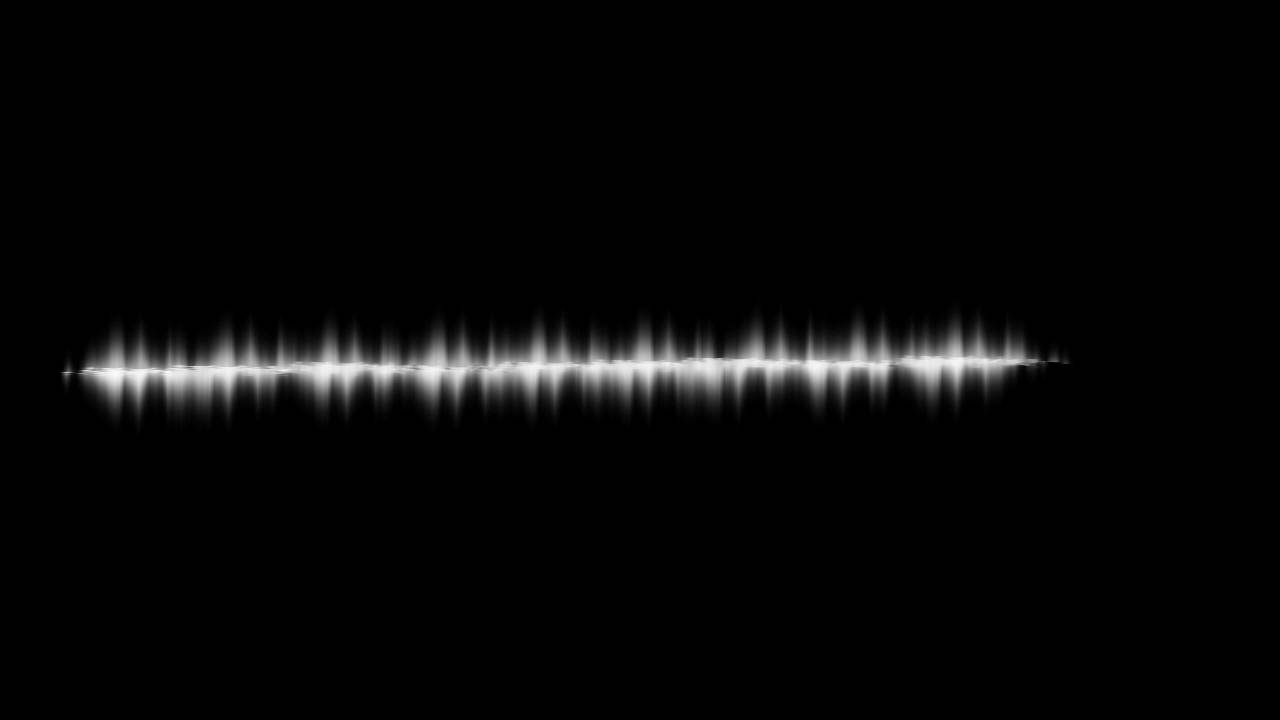
15. Now the biggest part is to make the effect looks like an Electric impulse. To do this, drag here and there upwards and downwards repeatedly. Finally click once at the left end and right ends without pressing "Shift" key to make sharp spikes. Follow the image.
16. Now double click on "Layer 1" in Layer palette. Follow the image.
17. Then a Layer style window will be opened. In that window click on "Outer glow" option. Then set "Opacity" to "100%" and select any color of your choice, set Range to "47%" and press ok.
18. Now select Text tool from Tools Panel.
19. Then change Font color to white and type the text of your choice. Now change Font size that suits to the Electric effect.
20. Now double click on the Text layer and apply the same measurements in Layer style window as said above except for "Size" which should be set to "11px".
21. Now go to Layer palette and click on "Add layer Mask" icon. Follow the image.
22. Then select "Gradient" tool from Tools panel and click on "Open gradient picker" (an inverted triangle) and select "Black and White" gradient type. Follow the image.
23. Now put cursor at the middle bottom of the Impulse. Then click and hold mouse left button and drag upwards.
24. That's it. Now look at the final beautiful Electric Impulse text which we have created.
Click here for part 1
Please leave your comments
Creating Electric Text Impulse effect in photoshop is a very easy trick. By using smudge tool only we can create this simple and bold effect.
1. Go to File menu and click on new option or simply press "CTRL + N" in keyboard. A window will be opened. Then adjust measurements as shown below WIDTH-1280,HEIGHT-720,RESOLUTION-72 pixels/inch and press ok.
2. Now select Paint bucket tool from Tools Panel. Follow the image.
3. Then fill the background with "Black" color by clicking mouse left button.
NOTE: Make sure that background color is set to default "Black" color by pressing "D" in keyboard.
4. Now go to Layer palette and click on New layer icon. Follow the image.
5. Now select "SMUDGE TOOL" from Tools Panel.
6. Now go to "WINDOW" menu and select "Brushes" option or simply press "F5" in keyboard.
7. Then a window will be opened. Now select "Brush Tip shape". Then select "Spatter 39 Pixel" type brush from a huge list and set Diameter to "188", Angle to "0" and Roundness to "4%". Then check "Smoothing" and Spacing options and set Spacing to "1%".
NOTE: Creating this kind of effects is mainly depends on changing Brush prestes options,brush angle, Roundness and selecting brush type.
8. Now set "Foreground color" to "White" by pressing "X" in keyboard.
9. Then go to Options bar and set "Strength" to "85%" and check "Finger painting" option as shown in the image.
10. Now click and hold mouse left button and hold down "SHIFT" key. Then drag mouse upwards.
11. Do this again (click+shift and drag upwards) by adding new brush edge to the previous brush edge.
12. Do this several times by adding brush edges as shown in the image.
Click here to continue for remaining part 2
Please notify me if you find any illegal activity or violation of rules in this blog.
My email id: zshady9@gmail.com
61-DOTS SPRAY BRUSHES 1 Download
62-FOG AND CLOUDY Download
63-HORROR NIGHTMARE Download
64-KIDS DOLLS BRUSHES Download
65-LINEAR STROKES 2 Download
66-LINES BRUSHES Download
67-RAIN DOWN SPIKES Download
68-SWIRLS 1 BRUSHES Download
69-SWRILS AND LINES ART 1 Download
70-SWRILS AND LINES ART 2 Download
PLEASE LEAVE YOUR COMMENTS
Report to this mail if links broken
zshady9@gmail.com