First click on Download link, then a new tab or window will be opened.
Now just press CTRL+S In your keyboard to download.
Please notify me if you find any illegal activity or violation of rules in this blog. My email id: zshady9@gmail.com
96-WEB 1 USE Download
97-WEB 1 VU Download
98-WEB 2 USE DING Download
99-WEB 2 VU Download
100-WEB 3 USE Download
PLEASE LEAVE YOUR COMMENTS
Report to this mail if links broken
zshady9@gmail.com.
NOTE: Don't forget to select background layer while making vertical selections.
15. Like this create remaining two vertical bands by following above steps. After creating bands, our image should look like below.
Colorful bands are now successfully created. But to make our bands a beautiful weave, we
need to practice some more steps. To do this
16. Select 1st vertical band layer in Layer palette and then select Rectangular Marquee tool. Now draw an outline (by holding mouse left button and drag downwards) around the vertical band exactly as shown in the image.
17. Now click "Mouse right button" on that selection outline and select "LAYER VIA CUT" option. Follow the image.
18. This creates a Layer with a cut part of selected area. Follow the image.
19. Now select this Layer(cut part Layer) which contains a cut part. Then hold down "CTRL" and press " ] " several times until that layer(cut part layer) reaches top. Follow the image.
20. Now select 2nd vertical band layer in Layer palette and make sure that you have selected Rectangular Marquee tool and draw an outline exactly as shown in the image.
21. Now click "Mouse right button" on that selection and select "LAYER VIA CUT" option as we did above.
22. This creates another Layer with another cut part. Follow the image.
23. Now select that layer which contains 2nd cut part. Then hold down "CTRL" and press " ] " several times until that Layer(cut part layer) reaches top. Follow the image.
24. Now select 3rd vertical band Layer in Layer palette and make sure you have selected Rectangular Marquee tool and draw an outline around the vertical band exactly as shown in the image.
25. Now click "Mouse right button" on that selection and select "LAYER VIA CUT" option as we did above. Follow the image.
26. Then a Layer with "3rd cut part" will be created. Follow the image.
27. Now select that Layer which contains 3rd cut part. Then hold down "CTRL" key and
press " ] " several times until that Layer(3rd cut part layer) reaches top.
28. Now we have finally created a colorful bands effect on a photo.
Click Here For Part 1
Please Leave Your Comments.
Creating color bands on a photo is very exiting and this can be done by using "Rectangular
Marquee tool". You will definitely be amazed with this effect.
1. Go to "File" menu and click on "Open" option or simply press "CTRL+O" and browse an image from your hard drive and press ok. Here I took a Face image.
To create bands with a particular size we have to take the help of "Ruler".
2. Press "CTRL+R" for "Ruler". Then put cursor on the upper ruler scale (horizontal scale) and hold down mouse left button and drag mouse downwards and do like this several times to set Horizontal model lines. In the same way put vertical lines as shown in the image.
3. Now select "Rectangular Marquee" tool from Tools Panel or simply press "M" in keyboard.
4. Now put cursor at the start point of first horizontal line and click and hold down mouse left button and drag horizontally along first 2 horizontal lines to create horizontal selection.
5. Now press "CTRL+C" for copy and "CTRL+V" for paste which creates a band of selected area which we can see in the Layer Palette.
6. Now go to "Layer palette" and double click on band layer(Layer 1). Then a window will be opened. Now check"DROP SHADOW" option and set measurements as shown in the image.
NOTE: Press "CTRL+;" to remove Guide lines temporarily to view our band on photo.
7. Now press "CTRL+B" or "CTRL+U". Here I have chosen "CTRL+U". Then a window will be opened. Now make adjustments of your choice which gives a good color to the band. Follow the image.
8. Now go to Layer palette and click on "New layer" icon which adds a new layer(Layer 2). Now hold down "CTRL" and click on "Layer 1" to select both layers(Layer1 and Layer2) and click mouse right button and select "MERGE LAYERS" option. Follow the image.
NOTE: Press "CTRL+;" to view Guide lines if they disappear when drawing bands.
9. Now select Background layer in Layer palette and then select Rectangular Marquee tool and draw another Horizontal band and double click on that layer, select "Drop shadow" option and set measurements as shown in "STEP(6)". Then press "CTRL+B" or "CTRL+U". Then make adjustments of your choice which gives a good color to the band. Follow the image.
10. Now click on "New layer" icon in Layer palette which adds a new layer and merge that layer(Layer 4) with Layer 3 as we did in "STEP(8)".
NOTE: Press "CTRL+;" to view Guide lines.
11. Now select Rectangular Marquee tool. Then put cursor at the start point of first vertical line and click and hold mouse left button and drag vertically along first 2 vertical lines to create vertical selection as we did earlier.
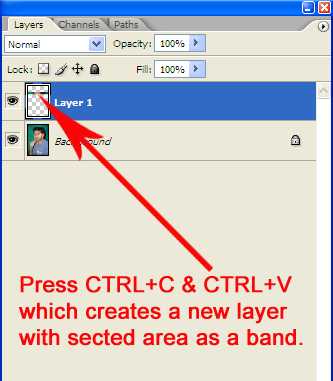
12. Now press "CTRL+C" and "CTRL+V" which creates a band of selected area which we can see in the Layer palette. Follow the image.
13. Now double click on vertical band layer in Layer palette. A window will be opened. Now select "DROP SHADOW" option and set measurements as shown in "STEP(6)". Then press "CTRL+B" or "CTRL+U" and give a suitable color to the band as we did earlier. Follow the image.
14. Now click on "New layer" icon in Layer palette and merge that new layer(Layer 6) with vertical band layer as we did in "STEP 8"(hold down "CTRL"and click on layer and right click and select Merge layers). This creates a vertical band.
Click Here To Continue For Remaining Part 2
Making this effect in Photoshop is a very simple trick. Placing a photo behind a broken glass
can be done with the use of a blending mode "SCREEN". To do this follow the steps.
1. First go to File menu and click on open option or simply press "CTRL + O" in keyboard. Then browse an image of your choice (image of a "Face" especially) which you want to put behind the broken glass.
2. Now open another image of a broken glass from your hard drive.
3. Now select "MOVE" tool from Tools Panel.
4. Now click and hold mouse left button on the broken glass image and drag it into the window that contains the image of a Face.
5. Now adjust the broken glass image properly over the image of face in a way that it fits the background face image.
6. Now it is time for a little magic. Go to "Layer palette" and click on an inverted triangle that shows several "Blending modes". Follow the image.
7. Then click on "SCREEN" blending option from that list. That's it, the photo of a face has successfully put behind the broken glass in a natural way by using "SCREEN" blending option.
Please Leave Your Comments