

THE LASSO TOOL (L):
This is also a selection tool like Rectangular Marquee Tool and other selection tools.
But this tool allows us to select areas of more complex images like eyes, clothing etc.
You can find lasso tool below Rectangular marquee tool in Tools Panel.
The lasso tools are available in 3 variations: The Lasso Tool, Polygonal Lasso Tool and Magnetic Lasso Tool.

Lasso Tool is a freehand selection tool which allows us to draw a selection around the object like drawing a picture on a paper with a pen or pencil.
1. First open an image. Go to file menu click on open option and browse your photo from your hard drives or just press "CTRL + O".

3. Now go to Tools Panel and select Lasso Tool.

4. First, click and hold mouse left button at the point where you want to begin the selection and continue dragging, to draw an outline.

5. Now to complete the selection simply return to the point where you began and release your mouse button.

NOTE: If you release the mouse button before reaching to the start point photoshop automatically creates a straight line between start point and mouse release point.
To truly say, Lasso Tool is not the most accurate selection tool in photoshop. But its ability can be improved by working with some options in the options bar like “ADD TO SELECTION” and “SUBTRACT FROM SELECTION” options.

6. Now observe image for errors in selection. To do this, press "CTRL + +" to zoom in and press "CTRL + -" to zoom out. Now press and hold tab and click on the image for moving image to find errors.
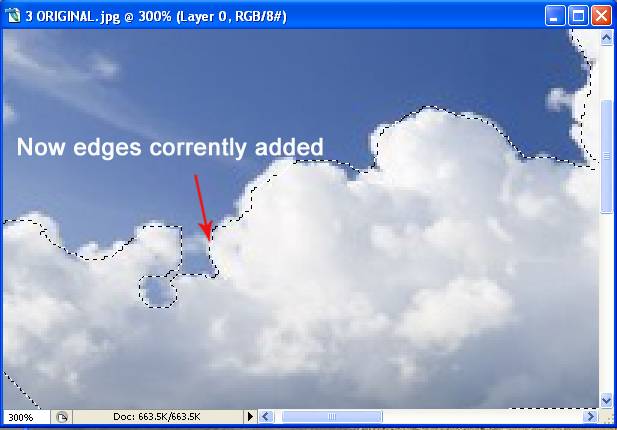
7. Here I have missed some edges.

To add the missed edges select “ADD TO SELECTION “ options in options bar.
8. Now click inside of the existing selection outline and drag out side of the selection along the edges (missed edges) of the area which you want to add. When you are done adding new area, again drag back inside the selection and release the mouse button.

NOTE: You can also do this by pressing and holding “SHIFT” key in keyboard. But there is no need to hold down SHIFT key all along the work. When you have started dragging mouse, you can release the shift key.
9. Now look at the image after correction.

Again observe for errors.
10. Here, I have selected some extra space.

To remove extra selected space, select “SUBTRACT FROM SELECTION” option in options bar.
Make sure that you still have the lasso tool selected.
11. Now click outside the selection out line and drag inside the selection along the edges which you have missed.

12. When you are done subtracting, again drag back to outside of the selection and release mouse button.
NOTE: You can also do this by pressing and holding “ALT” key. Here you need not to hold “ALT” key all along the work. Release “ALT” key after your first mouse click.
NOTE: Now you can zoom out by pressing "CTRL + -".
14. That’s it you are simply completed the selection with Lasso Tool.

15. Now you can put this image in a new document. To do this press "CTRL + C". then, open a new image and press "CTRL + V" to paste the image.
NOTE: Your copied image may have inappropriate sizes. So, press "CTRL + T", a boundary box will appear. Then press and hold "SHIFT + ALT" and put cursor at any corner of boundary box and drag inward to decrease the size or drag outward to increase the size. Now place image at an appropriate place.

16. Now look at my finished image.

NOTE: You can deselect the selection by just pressing "CTRL + D".
PLEASE LEAVE YOUR COMMENTS.
nice dude
ReplyDeletesuper
ReplyDeletegood
ReplyDeletegood
ReplyDelete