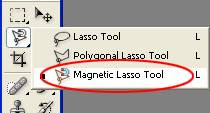
MAGNETIC LASSO TOOL:
In our previous tutorials we have completed with The Lasso Tool and Polygonal Lasso Tool. Now we have to have a look at the Magnetic Lasso Tool.
So, what is a Magnetic Lasso Tool?
As the name denotes Magnetic Lasso Tool actively searches for the edges of an object while you are moving your cursor around the object and the selection outline automatically attaches to the edges of an object like a magnet.
It automatically differentiates the object edges color from the background. It is a very handy tool for selecting areas which have reasonably well defined edges.
How to use Magnetic Lasso Tool?
1. Open an image. Go to file menu and click on open option and browse image from your hard drives or simply press CTRL+O.
2. Select Magnetic Lasso Tool. To select, right click on Lasso Tool and from 3 Lasso tools, go down and select 3rd tool.
3. After selecting the Magnetic Lasso Tool, your cursor may appear in 2 variations. You can switch to these modes by pressing Caps Lock key.
The circle represents the width of the area that Photoshop looks for edges.
4. Now you have to set a “First Point” at any edge of the object. To do this, move cursor over the image and click once at any edge and release mouse button. You need not to hold mouse left button. After setting first point, move cursor around the object. While doing this you will find a line which will automatically attaches to the edges of the object.
NOTE: If you want to see the points clearly and to make accurate selection, you have to work in ZOOM IN mode. To change to zoom in mode, press CTRL++. Now press “SPACR BAR” and click and drag the object according to your need.
5. Now continue moving cursor around the object until the start point and click on that initial point to complete the selection.
NOTE: When you are close to the initial point, a circle appears at the bottom of Magnetic Lasso Tool which indicates that we are close to initial point and we can click at that point to complete selection.
6. Now we have selected the image.
7. Now observe for errors. Here in my selection, I have to subtract some area (middle part of the mountain) from my selection.
To do this press and hold “ALT” key and click once at the edge of the area which you want to subtract. Now, after your first click, you can release your “ALT” key.
8. Now continue moving cursor around the edges until the initial point as we did above and click at that initial point to complete the selection to subtract that selected area. Look at the image.
9. Sometimes we will have to work with some more options which are present in options bar. We have to set all these options before our first click to begun our selection. We will not be able to set these options once we began selection. But with some short cuts, we can set these options while we are working.
10. ANTI ALIAS: Check anti alias option which softens the edges.
11. WIDTH: If edges of the object are well defined, you can increase the width, which allows us to move mouse freely and faster around the object.
If edges of the object are poorly defined, you can decrease the width, which allows us to move mouse very slowly around the object.
While you are working, Press the left bracket key ( [ ) to make the circle smaller, or the right bracket key ( ] ) to make it larger. You'll see the value for the Width option changing in the Options bar.
NOTE: Press caps lock key to see the increased size of Magnetic Lasso Tool.
12. EDGE CONTRAST: This option allows Magnetic Lasso Tool to differentiate between object color and its background color.
For high contrast between object and its background, use higher edge contrast value.
For poor contrast between the object and its background, use lower edge contrast and lower width values.
Here my object contrasted more from its background so, I used more contrast value.
To change this value while you're working, press “ .” (full stop) on your keyboard to increase the contrast value or press ” , “ (comma) to decrease it. You'll see the value changing in the Options Bar.
13. FREQUENCY: If you give higher frequency value, the anchor points will be added more.
NOTE: 57 frequency value is the Ideal one.
14. Now go back to the old image and press CTRL+C to copy the selected image.
15. Open a new image and press CTRL+V to paste the copied image.
NOTE: Press CTRL+T to appear a boundary box around the copied object. Put cursor at any corner of boundary box and drag inward to decrease the size and drag outward to increase the size.
16. Now look at the completed image.
PLEASE LEAVE YOUR COMMENTS.


No comments:
Post a Comment