

CLONE STAMP TOOL (S):
This time we shall deal with Clone Stamp Tool.
The Clone Stamp Tool and Healing Brush Tool are always confusing Photoshop users. They seem to be work similarly, but they have distinct differences.
Clone Stamp Tool samples pixel from one area on which we click and clones this area on to another area.
It covers an area with the sampled area. But Healing Brush Tools blend or combine sampled area with another area.
To practice this tool follow the steps.
1. First open an image. Go to file menu and click on open Option or press CTRL + O. Then browse image from your hard drives and press ok.

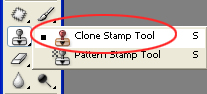
2. Now select Clone Stamp Tool from Tools Panel or simply press "S" in keyboard.

3. After selecting Clone Stamp Tool, you will find some options in options bar.
(A) Brush presets: From Brush Preset Picker, you can select your desired brush with desired diameter.

NOTE: You can increase brush size by pressing " ] " (right bracket) or you can decrease brush size by pressing " [ " (left bracket). but these short cuts changes only brush size but not the brush hardnees.

(B) OPACITY: If you decrease opacity value, Clone Stamp Tool clones more transparent copy. If you increase opacity value, Clone Stamp Tool clones less transparent copy. This means Clone Stamp tool copies original color. so opacity controls the amount or intensity of the color. Hence use 100% opacity value.
(C) FLOW: Flow controls the rate at which the color flows from your tool or brush.
(D) ALIGNED: If we check this option, the image which we are cloning will be drawn continuously even if we release mouse button while drawing.
If this option is unchecked means, we need to make "a Sampling Point" each time when we release mouse button and draw the image again.
NOTE: All these options with default values will give better result (don't change these options unless you need)
4. Now add a New layer. To do this go to Layer Palette and click on New Layer Icon. Now we will have to do all our work on this New layer. because if we work directly on the image, there is a chance of making our original image worst.
Because we are working with two layers, we have to check an option "Sample All Layers" in options bar.
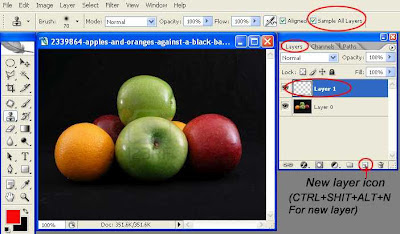
If we work with Clone Stamp Tool without checking this option, we will get nothing, because we are working on new layer which contains nothing. If we check this option means we are allowing Photoshop to sample from all visible layers.
5. Now hold down "ALT" key. when cursor turns to a target symbol press mouse left button in the image to set "a sampling Point".

6. Then click and drag over the image which you want to cover with the sampled image.
Now you will observe that the image on which you are dragging will be covered with the
sampled image.

While you are drawing on the image, a "+" symbol appears and moves on the sampled image indicating that it is cloning area from the part on which it is moving.
NOTE: Hold down CTRL + SPACEBAR and click mouse left button on the image to work with zoom in mode to cover edges of the image clearly.
Hold down spacebar and click on the image to move the image around the workspace.
Now we need to adjust brush sizes with short cuts said earlier and do single clicks around the edges to cover edges clearly with the sampled image. After the completion of cloning, hold down ALT + SPACEBAR and click on the image to zoom out.
7. Now we have successfully cloned image over another image with Clone Stamp Tool.
Look at the result.

* We can also use some "Blend Modes" in options bar before cloning. This Blend Modes affect the layer (on which we are working) by blend in(combines or matches) with the layers beneath it.
Here I showed some images which are cloned with some Blend Modes.

PLEASE LEAVE YOUR COMMENTS
This time we shall deal with Clone Stamp Tool.
The Clone Stamp Tool and Healing Brush Tool are always confusing Photoshop users. They seem to be work similarly, but they have distinct differences.
Clone Stamp Tool samples pixel from one area on which we click and clones this area on to another area.
It covers an area with the sampled area. But Healing Brush Tools blend or combine sampled area with another area.
To practice this tool follow the steps.
1. First open an image. Go to file menu and click on open Option or press CTRL + O. Then browse image from your hard drives and press ok.

2. Now select Clone Stamp Tool from Tools Panel or simply press "S" in keyboard.
3. After selecting Clone Stamp Tool, you will find some options in options bar.
(A) Brush presets: From Brush Preset Picker, you can select your desired brush with desired diameter.

NOTE: You can increase brush size by pressing " ] " (right bracket) or you can decrease brush size by pressing " [ " (left bracket). but these short cuts changes only brush size but not the brush hardnees.
(B) OPACITY: If you decrease opacity value, Clone Stamp Tool clones more transparent copy. If you increase opacity value, Clone Stamp Tool clones less transparent copy. This means Clone Stamp tool copies original color. so opacity controls the amount or intensity of the color. Hence use 100% opacity value.
(C) FLOW: Flow controls the rate at which the color flows from your tool or brush.
(D) ALIGNED: If we check this option, the image which we are cloning will be drawn continuously even if we release mouse button while drawing.
If this option is unchecked means, we need to make "a Sampling Point" each time when we release mouse button and draw the image again.
NOTE: All these options with default values will give better result (don't change these options unless you need)
4. Now add a New layer. To do this go to Layer Palette and click on New Layer Icon. Now we will have to do all our work on this New layer. because if we work directly on the image, there is a chance of making our original image worst.
Because we are working with two layers, we have to check an option "Sample All Layers" in options bar.

If we work with Clone Stamp Tool without checking this option, we will get nothing, because we are working on new layer which contains nothing. If we check this option means we are allowing Photoshop to sample from all visible layers.
5. Now hold down "ALT" key. when cursor turns to a target symbol press mouse left button in the image to set "a sampling Point".

6. Then click and drag over the image which you want to cover with the sampled image.
Now you will observe that the image on which you are dragging will be covered with the
sampled image.

While you are drawing on the image, a "+" symbol appears and moves on the sampled image indicating that it is cloning area from the part on which it is moving.
NOTE: Hold down CTRL + SPACEBAR and click mouse left button on the image to work with zoom in mode to cover edges of the image clearly.
Hold down spacebar and click on the image to move the image around the workspace.
Now we need to adjust brush sizes with short cuts said earlier and do single clicks around the edges to cover edges clearly with the sampled image. After the completion of cloning, hold down ALT + SPACEBAR and click on the image to zoom out.
7. Now we have successfully cloned image over another image with Clone Stamp Tool.
Look at the result.

* We can also use some "Blend Modes" in options bar before cloning. This Blend Modes affect the layer (on which we are working) by blend in(combines or matches) with the layers beneath it.
Here I showed some images which are cloned with some Blend Modes.

PLEASE LEAVE YOUR COMMENTS
No comments:
Post a Comment