SPOT HEALING BRUSH TOOL (J):
In this tutorial we are going to learn about the most amazing and interesting tool in photoshop, Spot Healing Brush Tool.
This is the new tool in healing tools collection.
As the name denotes, this tool allows us to heal or repair spots, pimples or acne (other blemishes) on skin and dust or dirt on images without changing original color of problem area.
This tool replaces problem area’s texture with a fair or good texture from surrounding area.
1. Open an image from your hard drives (which contains some problem areas). Here I took an image with some blemishes on skin.
2. Now add a new layer. To do this, go to Layer Palette and click on New Layer icon. Follow the image.
Now we will have to do all our work on this layer. If we work on original image, there might be a chance of making our original image worst.
3. Then, select Spot Healing Brush Tool from Tools Panel. Follow the image.
4. You will find some options in options bar. In that “Sample All Layers” is the key one because we are working with two layers. If we work with Spot Healing Brush Tool without checking this option, we get nothing, because we are working on layer (new layer) which contains nothing.
If you check this option means you are allowing Photoshop to sample from all visible layers. This means Photoshop will look at the image on the background layer as well.
PROXIMITY MATCH: By default this option is checked. This means Spot Healing Brush Tool replaces the problem areas on which we click with fine or good surrounding area.
CREATE TEXTURE: If there is no good surrounding area to replace the problem area, check this option. This option allows Photoshop to create its own texture which it feels the fine or good texture.
* Lighten: This option works best when we are working with pimples or acne on skin. If you select this option, Spot Healing Brush Tool replaces the darker area (since blemishes are darker than normal skin tone). Here I selected Lighten option.
NOTE: If you select Darker option, Spot Healing Brush Tool replaces the lighter areas.
5. After setting all these options zoom in the image to see the blemishes clearly. To do this, press “Z” letter in key board or press and hold CTRL + SPACE BAR and click on the image to zoom in. Now press space bar and click on the image to move the image around the workspace.
NOTE: Press and hold ALT + SPARE BAR key and click on the image to zoom out.
6. Now we have to adjust brush size because to get better result, brush size should be slightly larger than the blemishes or problem area.
To increase brush size, press “]” (right bracket key) or press “[“(left bracket key) to decrease the brush size.
7. After adjusting the brush size click on blemishes or problem area to heal or repair that area. We usually need only one click.
NOTE: A black spot will appear when you click on the problem area which is a temporary mark. After some time it will gone.
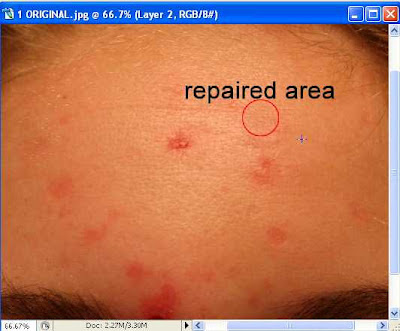
8. You will notice that the problem area on which we click will be replaced with fine or good surrounding area. Follow the image.
9. Usually we need only one click. Just click once on all problem areas by adjusting brush sizes. If you find any long scratches, just press and hold mouse left button and drag down on the scratch and release mouse button.
10. Now look at the image which we have repaired or healed with Spot Healing Brush Tool.
Compare both healed or repaired and old images.
Before Healing
After Healing
PLEASE LEAVE YOUR COMMENTS:


No comments:
Post a Comment